Understanding SPF, DKIM, and DMARC

What Is This Guide For and Why Bother?

If you are invovled in developing, supporting, or maintaining an application that sends emails, this guide is a must read. This guide is your key to peace of mind, knowing that your emails will reach your customers as intended and your domain is shielded from abuse from cybercriminals and spammers.

It’s about ensuring they reach the intended destination – the recipient’s inbox, not the spam or junk folder. For instance, You’ve built an e-commerce application or a SaaS platform that sends transactional emails like order confirmations or password resets or important customer notification emails. These emails are crucial touchpoints for your customers. But what if they never see them? What if these important communications end up in spam or junk?

While email is one of the most common communication channels, it’s also a favorite target for cybercriminals and a playground for spammers. Here are some real-world examples of how they can abuse email systems:

  • Phishing Attacks: A cybercriminal wants to steal sensitive information from the customers of a well-known bank. The criminal could spin up or use a compromised server to send emails that appear to come from the bank’s domain, asking customers to update their account information. If the bank hasn’t implemented SPF, the email could pass the receiving server’s checks and land in the customer’s inbox. The customer, thinking the email is from their bank, clicks the link and enters their login details on a fake website controlled by the criminal. The criminal can now access the customer’s bank account.

  • Brand Impersonation: A cybercriminal could impersonate a popular e-commerce platform and send emails to users asking them to confirm their purchase of an expensive item. The email could contain a link to a fake customer support page where the user is asked to enter their login details to cancel the purchase. If the e-commerce platform hasn’t implemented DKIM, the email could pass the receiving server’s checks and land in the user’s inbox. The user, thinking the email is from the e-commerce platform, enters their login details on the fake page, giving the criminal access to their account.

  • Business Email Compromise (BEC): A cybercriminal could impersonate a company’s CEO or another high-ranking official and send an email to the finance department, asking them to make a payment to a new vendor. If the company hasn’t implemented DMARC, the email could pass the receiving server’s checks and land in the finance department’s inbox. The finance department, thinking the email is from the CEO, could make the payment to the criminal’s bank account.

By understanding and implementing SPF, DKIM, and DMARC, you can protect your domain from being used in these types of attacks, safeguard your customers and employees, and maintain your reputation.

So, why bother? Because your emails matter, your customers matter, and your reputation matters.

Why Choose This Guide?

With so many articles out in the internet why should I choose this guide? This guide stands out for its simplicity, clarity, and convenience. It demystifies SPF, DKIM, and DMARC with clear explanations and examples avoiding the technical jargon as much as possible. Hosted on GitHub, it integrates seamlessly with your development environment, providing quick access to information right from your IDE (visual studio code ,etc.) or command line. Plus, it’s a document that will stay in Github and guaranteed that won’t go anywhere that can be edited by you or anyone or the community to ensure it stays updated and relevant.

What This Guide Is Not For

While this guide aims to simplify SPF, DKIM, and DMARC, it’s not intended to be a comprehensive guide about these topics. It’s not a guide for setting up an email server, nor does it cover advanced topics like encryption or secure email gateways.

SPF, DKIM, and DMARC: Simplified

SPF (Sender Policy Framework)

SPF: It’s like a list of friends who can send emails for you. The SPF Record is this list. If an email says it’s from you but it’s not sent by a friend on your list, it’s probably not really from you.

As the owner of a domain, you can use SPF to create a list of ’email friends’ – these are the mail servers that are allowed to send emails on your behalf. This helps stop people who aren’t your ’email friends’ from pretending to be you. The SPF Record, a DNS TXT record, is where you keep this list of ’email friends’.

The DNS TXT record for an SPF your ’email friends’ typically looks like this:

v=spf1 ip4:123.123.123.123 ~all

Here’s the command I usually run to fetch that:

dig TXT example.com

DKIM (DomainKeys Identified Mail)

DKIM: It’s like a secret note inside your emails. When you send an email, you put a secret note inside. This note is made using a special secret code only you know. When your email arrives, the receiver checks the secret note using a public code that everyone knows. This public code is stored in a place called the DKIM Record. If the secret note matches the public code, the email is really from you and hasn’t been changed. This helps stop bad people from pretending to send emails from you or changing your emails.

This public code, also known as a public key, is stored in a DNS TXT record known as the DKIM Record, which is accessible to everyone. It’s like the decoder for your secret code.

The DNS TXT record, where the public code (or public key) for DKIM is stored, typically looks like this:

v=DKIM1; k=rsa; p=NICfMA0GCSqGSIb3DQEBAQUAA4GNADCBiQKBgQDBolTXCqbxwoRBffyg2efs+Dtlc+CjxKz9grZGBaISRvN7EOZNoGDTyjbDIG8CnEK479niIL4rPAVriT54MhUZfC5UU4OFXTvOW8FWzk6++a0JzYu+FAwYnOQE9R8npKNOl2iDK/kheneVcD4IKCK7IhuWf8w4lnR6QEW3hpTsawIDAQ0B"

Here’s the command I usually run to fetch that:

dig TXT selector1._domainkey.yourdomain.com

Note: Replace selector1 with your actual selector, and yourdomain.com with your actual domain. This command will fetch the DNS TXT record where your public code is stored.

DMARC (Domain-based Message Authentication, Reporting & Conformance)

DMARC: It’s like the boss of SPF and DKIM. It takes the rules from SPF and DKIM and makes a big rule book. This rule book tells everyone what to do if an email from your domain doesn’t follow the rules. For example, one rule could be to send a report if an email doesn’t pass the checks. The DMARC Record, a place everyone can see, holds this rule book.

If an email passes the SPF and DKIM checks, the receiver then looks at the DMARC rule book to decide what to do with the email. They might follow the rule to send a report, or they might follow another rule depending on what your rule book says.

DMARC allows domain owners to declare their rules in the rule book. This rule book, stored in the DMARC Record, a DNS TXT record, specifies your DMARC policies and how receivers should handle mail that violates these rules. If both SPF and DKIM checks pass, the receiver then checks the DMARC rule book to decide what to do with the email.

The DNS TXT record for DMARC ‘rule book’ typically looks like this:

v=DMARC1; p=none; rua=mailto:postmaster@example.com

Here’s the command I usually run to fetch that:

dig _dmarc.example.com TXT

Real World Examples of SPF, DKIM, and DMARC Are Used

Let’s look at how SPF, DKIM, and DMARC work in real-world example scenarios:

  • Mobile Apps: Mobile apps that send emails, such as a fitness app sending workout summaries or a banking app sending transaction alerts, also use SPF, DKIM, and DMARC. When the app sends an email, the receiving server checks if the sending server’s IP is in the SPF record of the sender’s domain. It then uses the DKIM record to verify the email’s DKIM signature. If both checks pass, the server applies the DMARC policy to decide what to do with the email. This ensures that the emails reach the user’s inbox and not the spam folder, and protects the app’s reputation by preventing email spoofing.

  • Email Service Providers: Providers like Gmail, Yahoo, and Outlook use SPF, DKIM, and DMARC to authenticate incoming emails. For instance, when an email arrives, Gmail checks if the sending server’s IP is in the SPF record of the sender’s domain. It then uses the DKIM record to verify the email’s DKIM signature. If both checks pass, Gmail applies the DMARC policy to decide what to do with the email.

  • Social Media Platforms: Social media platforms like LinkedIn, Facebook, or Twitter that send notification emails also use SPF, DKIM, and DMARC. When a user receives a notification email, their email provider checks if the sending server’s IP is in the SPF record of the social media platform’s domain. It then uses the DKIM record to verify the email’s DKIM signature. If both checks pass, the provider applies the DMARC policy to decide what to do with the email. This ensures that the emails reach the user’s inbox and not the spam folder, and protects the social media platform’s reputation by preventing email spoofing.

  • Businesses: Businesses use SPF, DKIM, and DMARC to protect their email communication and brand reputation. For example, a business might send promotional emails to its customers. By implementing SPF, DKIM, and DMARC, the business ensures that its emails are not marked as spam and that its domain is not used for email spoofing.

  • Government Agencies: Government agencies use SPF, DKIM, and DMARC to secure their email communication and prevent phishing attacks. For instance, a government agency might send notifications to citizens. By using SPF, DKIM, and DMARC, the agency ensures that its emails reach the citizens’ inbox and that cybercriminals cannot send phishing emails that appear to come from the agency.

Now I Know These Things, What’s Next?

Now that you’ve learned the basics of SPF, DKIM, and DMARC, you might be thinking about using these tools to make your emails more secure. Here’s a simple guide to help you get started:

  1. Identify the Email Address and Domain: First, you need to know the email address and domain your app uses. You’ll need to add SPF, DKIM, and DMARC records to this domain. A simple way to find this out is by sending an email from your app to yourself. For example, you could sign up for an account on your site and click on ‘forgot password’ to receive an email.

  2. Current Status: Next, check if you already have SPF, DKIM, and DMARC records. If you do, make sure they’re set up correctly. You can learn how to do this in the next section, ‘Checking Your SPF, DKIM, DMARC Status’.

  3. Domain Access: Make sure you have the rights to change the DNS records of your domain. You’ll need this to add SPF, DKIM, and DMARC records. If you don’t have access, you’ll need to request the person who does to add these records for you.

  4. DMARC Monitoring: Once you’ve set up DMARC, you’ll need to keep an eye on DMARC reports to make sure everything’s working as it should and fix any problems. Decide who will do this and which email address will receive the DMARC reports.

The usual order is to set up the SPF record first, then DKIM, and finally DMARC.

Checking Your SPF, DKIM, DMARC Status

This is a straightforward with tools like MXToolbox and DMARCTester. Here’s how you can use these tools:

  1. MXToolbox:

    • Visit https://mxtoolbox.com/
    • Use the ‘SPF Record Lookup’, ‘DKIM Record Lookup’, and ‘DMARC Record Lookup’ tools to check the respective records for your domain.
  2. DMARCTester:

    • Visit https://www.dmarctester.com/
    • This site offers two ways to check your email security:
      • Send an Email: The site generates a unique email address for you. You can then send an email from your application or mail server to this address.
      • Paste Email Headers: Alternatively, you can send an email from your application to your own email address, then copy the email headers and paste them into the tool.

Remember, these checks help you understand what’s missing or needs improvement to enhance your email security and reputation, make sure you take note of that and take action.

Note: When using online tools, only share what’s needed. Always check the site’s privacy rules to keep your info safe. I’m sharing these tools because they’re helpful, not because I am affiliated with them.

FAQ’s with SPF, DKIM and DMARC

  1. What email address should I use for DMARC reporting?

    It’s a good idea to use an email address that multiple people can check. This is often a shared mailbox. Ideally, this email address should be from the same domain that you’re setting up DMARC for. If you decide to use an email address from a different domain, you’ll need to add an extra step: You’ll have to add a special record (called a DNS TXT record) to authorize the other domain to receive DMARC reports.

  2. What’s the difference between ~all, -all, ?all, and +all in an SPF record?

    These are used to tell receiving servers what to do if an email comes from a server that isn’t listed in your SPF record.

    • ~all (SoftFail): This means “It’s okay if the server isn’t on my list, but be aware that it might not be legit.” The email will still be accepted, but it might be marked as suspicious. This is often used when you’re still testing your SPF record or making changes to it.

    • -all (Fail): This means “Only accept emails from servers on my list. Reject everything else.” This is used when you’re sure of all the servers that should be sending emails for your domain.

    • ?all (Neutral): This means “I’m not saying whether servers should be on my list or not. Treat the email as you normally would.” This doesn’t really give any instructions about how to handle the email, so it’s not used very often.

    • +all (Pass): This means “Accept emails from all servers, even if they’re not on my list.” This isn’t recommended because it could allow spammers to send emails that look like they’re from your domain.

    The choice between these depends on how strictly you want to enforce SPF rules for your domain. It’s generally recommended to use ~all while testing or setting up your SPF record, and switch to -all once you are confident that your SPF record is correct.

  3. Can I set up DMARC without SPF?

    Technically, you can, but it’s not a good idea. DMARC is like a security guard for your emails. It uses two tools, SPF and DKIM, to check if an email is really from you. If an email fails both the SPF and DKIM checks, it also fails the DMARC check.

    If you set up DMARC without SPF, it’s like the security guard is missing one of its tools. It can still use DKIM to check emails, but it won’t be as effective.

    SPF isn’t perfect and can’t stop all fake emails on its own. That’s why it’s best to use it together with DKIM and DMARC. This gives you a more complete email security system.

  4. I’ve looked at an email header and I see multiple SPF fails and some SPF passes. Which one should I believe?

    Think of an email header like a story. The most recent events are at the top, and the oldest events are at the bottom. So, the original sender’s information is usually towards the bottom of the header.

    If you see multiple SPF fails and a couple of SPF passes, it might feel like the story is getting confusing. But don’t worry! You should trust the SPF check that’s related to your domain or the domains that you trust (like your ‘friends list’). The other SPF checks are for other domains that were part of the email’s journey, and their pass or fail status doesn’t affect your domain’s SPF status.

Wrapping Up

Just like a secret handshake, SPF, DKIM, and DMARC are the hidden heroes of email security. They’re the reason your email recipients can trust messages from your domain. So, the next time you hit ‘send’, remember that these three musketeers are working tirelessly behind the scenes to keep your email safe.

Contributing

Spotted a mistake or missing info in this guide? Don’t be shy! Raise an issue or better yet, fork this repo and raise a PR. Your contributions help make this guide better for everyone.

Sharing is Caring

You’re welcome to share, clone, fork, or bookmark this content. All we ask is that you give credit where it’s due 🙂

“Understanding SPF, DKIM, and DMARC: A Simple Guide” by Nicanor II Flavier, used under CC BY 4.0. To view the original material, visit https://github.com/nicanorflavier/spf-dkim-dmarc-simplified

10 Habits

  1. They set clear goals. Successful people know what they want, and they have a plan to get there. They set clear, specific goals for themselves and work towards achieving them. By having a clear direction, they are able to focus their energy and resources on what matters most. This helps them stay motivated and on track, and it allows them to measure their progress and make adjustments as needed.
  2. They are proactive. Successful people don’t wait for opportunities to come to them – they create their own. They are proactive in seeking out new opportunities and making things happen. Rather than reacting to situations, they take control and actively work towards their goals. This proactive approach allows them to be proactive in their careers and personal lives, and it helps them seize new opportunities as they arise.
  3. They are consistent. Successful people are consistent in their actions and habits. They don’t just work hard occasionally, they work hard consistently. Whether it’s showing up to work on time every day or putting in extra time to complete a project, they are reliable and consistent in their efforts. This consistency allows them to build momentum and make progress towards their goals, and it helps them establish a reputation for being dependable and hardworking.
  1. They are resilient. Successful people don’t let setbacks and failures get them down. They are resilient and bounce back from challenges quickly. They view failures as learning opportunities and use them to improve and grow. This resilience allows them to persevere through difficult times and keeps them from becoming discouraged or defeated.
  2. They are open to learning. Successful people are lifelong learners. They are open to new ideas and are constantly seeking out opportunities to learn and grow. They are receptive to feedback and are willing to adapt and change as needed. This open-minded approach allows them to stay current and relevant in their field, and it helps them continuously improve and evolve.
  3. They are disciplined. Successful people have self-discipline and are able to control their thoughts and actions. They have the ability to stay focused and avoid distractions, and they are able to resist temptation and make sacrifices in order to achieve their goals. This discipline allows them to stay on track and make progress towards their goals, and it helps them avoid pitfalls and distractions.
  4. They are adaptable. Successful people are adaptable and able to roll with the punches. They are flexible and can adjust to new situations and challenges as they come. They are able to think on their feet and come up with creative solutions. This adaptability allows them to navigate change and uncertainty, and it helps them stay resilient and resourceful.
  5. They are organized. Successful people are organized and know how to manage their time effectively. They prioritize their tasks and are able to juggle multiple projects without getting overwhelmed. They are also able to delegate tasks and work efficiently with a team. This organization allows them to be productive and efficient, and it helps them avoid feeling overwhelmed or stressed.
  6. They are confident. Successful people have confidence in their abilities and believe in themselves. They are able to communicate effectively and present themselves with poise and self-assurance. They are not afraid to take risks and embrace challenges. This confidence allows them to take on new challenges and pursue their goals with conviction, and it helps them inspire and influence others.
  7. They are positive. Successful people have a positive attitude and approach to life. They focus on the good things and are able to find the silver lining in difficult situations. They are optimistic and have a growth mindset, believing that with hard work and effort, they can improve and achieve their goals. This positive attitude helps them stay motivated and energized, and it helps them attract positive opportunities and experiences.

Quick product development – for early stage startups

  1. Automate your CI/CD pipeline. Saves a lot of time on manual work and allows your team to release multiple times a day.
  2. Use a monorepo. That will keep things simple, organised and transparent within your startup.
  3. Break all features into small, incremental changes. That enables early feedback and reduces the chances of a big failure.
    • product team should break work into 1-2 days tasks
    • engineering team should push their changes daily
  4. Use feature flags.
    • engineering team won’t have fear to deploy
    • you can roll out features to a beta group of users
    • you can gather feedback from your team and external users faster
    • you can run a/b tests and perform experiments
  5. Define product and engineer owners for every feature.
    • to avoid shared responsibility and delivery delays
    • to encourage personal responsibility and unlock all talents of your team
  6. Request at least one demo per week. Motivate your team to share their work early, so you can discover bugs and provide feedback before too much time spent.
    • prototype → preview → beta → production — these are four demos you should ask your team to record for every feature
    • every feature team should record 1-2 demos every week
  7. Deploy weekly and follow simple CI/CD process.
    • use single branch (develop) for all development, deploy to test environment on every commit
    • merge develop branch into main once a week to deploy to production
  8. Freeze the code before release.
    • helps your QA team to test changes and ensure quality before production release.
  9. Don’t write many tests if you’re early stage startup.
    • tests are great in the long run, but can slow you down in the short run.

Calculating costs and benefits

The process of calculating costs and benefits is also called calculating return on investment, or ROI. There are many ways to determine a project’s ROI, but the easiest way is to compare the upfront and ongoing costs to its benefits over time.

One common ROI formula is:

In this formula, G represents the financial gains you expect from the project, and C represents the upfront and ongoing costs of your investment in the project.

For example, imagine your project costs $6,000 up front plus $25 per month for 12 months. This equals $300 per year, but you estimate that the project will bring in $10,000 in revenue over the course of that year. Using the formula above, you calculate the ROI as: ($10,000 – $6,300) ÷ $6,300 = 0.58 = 58%

The ROI comes to 0.58, or 58%. You consider this to be a strong ROI, so you decide to pursue the project.

Performing a cost-benefit analysis can help you and your stakeholders determine if it makes sense to take on a new project by evaluating if its benefits outweigh its costs. When conducting cost-benefit analyses for your prospective projects, you can use the guiding questions and ROI formula provided in this reading as a reference. 

To learn more about performing a cost-benefit analysis, check out these articles:


Rust and WebAssembly

There are two use cases for Rust and WebAssembly

  • Build an entire application based in Rust
  • Build a part of the application with usin Rust and a front end js framework

Install Rust

Wasm Pack


https://developer.mozilla.org/en-US/docs/WebAssembly/Rust_to_wasm

Correct file permissions for WordPress

 # Set all files and directories user and group to wp-user
    chown wp-user:wp-user -R *

    # Set uploads folder user and group to www-data
    chown www-data:www-data -R wp-content/uploads/

    # Set all directories permissions to 755
    find . -type d -exec chmod 755 {} \;

    # Set all files permissions to 644
    find . -type f -exec chmod 644 {} \;
Published
Categorized as Wordpress

Setup lets encrypt auto renewal

Please follow below below link and select your os and server details. Then follow the commands.

https://certbot.eff.org/

Published
Categorized as Wordpress

Machine learning algorithms – quick read

Linear Regression

Linear Regression involves finding a ‘line of best fit’ that represents a dataset using the least squares method. The least squares method involves finding a linear equation that minimizes the sum of squared residuals. A residual is equal to the actual minus predicted value.

To give an example, the red line is a better line of best fit than the green line because it is closer to the points, and thus, the residuals are smaller.


Ridge Regression

Ridge regression, also known as L2 Regularization, is a regression technique that introduces a small amount of bias to reduce overfitting. It does this by minimizing the sum of squared residuals plus a penalty, where the penalty is equal to lambda times the slope squared. Lambda refers to the severity of the penalty.


Without a penalty, the line of best fit has a steeper slope, which means that it is more sensitive to small changes in X. By introducing a penalty, the line of best fit becomes less sensitive to small changes in X. This is the idea behind ridge regression.

Lasso Regression

Lasso Regression, also known as L1 Regularization, is similar to Ridge regression. The only difference is that the penalty is calculated with the absolute value of the slope instead.


Logistic Regression

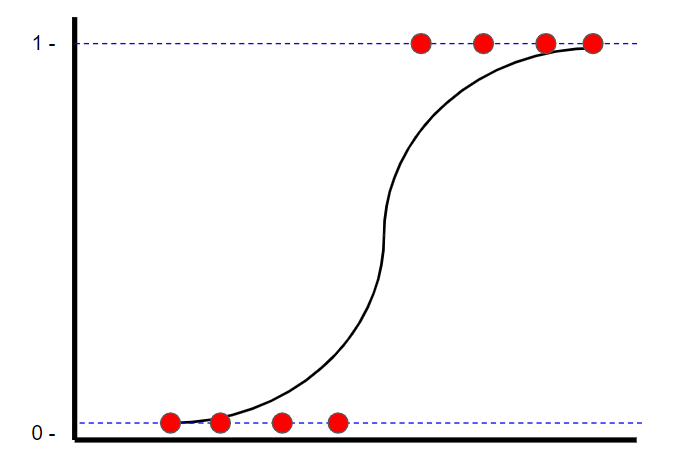
Logistic Regression is a classification technique that also finds a ‘line of best fit.’ However, unlike linear regression, where the line of best fit is found using least squares, logistic regression finds the line (logistic curve) of best fit using maximum likelihood. This is done because the y value can only be one or zero.

K-Nearest Neighbours

K-Nearest Neighbours is a classification technique where a new sample is classified by looking at the nearest classified points, hence ‘K-nearest.’ In the example below, if k=1, then an unclassified point would be classified as a blue point.


If the value of k is too low, then it can be subject to outliers. However, if it’s too high, then it may overlook classes with only a few samples.

Naive Bayes

The Naive Bayes Classifier is a classification technique inspired by Bayes Theorem, which states the following equation:


Because of the naive assumption (hence the name) that variables are independent given the class, we can rewrite P(X|y) as follows:


Also, since we are solving for y, P(X) is a constant, which means that we can remove it from the equation and introduce a proportionality.

Thus, the probability of each value of y is calculated as the product of the conditional probability of xn given y.

Support Vector Machines

Support Vector Machines are a classification technique that finds an optimal boundary, called the hyperplane, which is used to separate different classes. The hyperplane is found by maximizing the margin between the classes.

Decision Trees

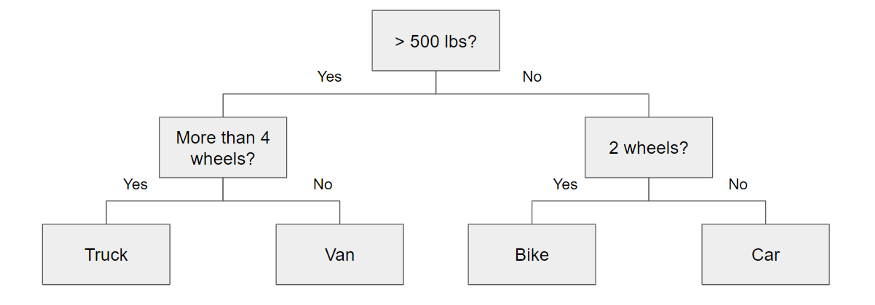
A decision tree is essentially a series of conditional statements that determine what path a sample takes until it reaches the bottom. They are intuitive and easy to build but tend not to be accurate.

Random Forest

Random Forest is an ensemble technique, meaning that it combines several models into one to improve its predictive power. Specifically, it builds 1000s of smaller decision trees using bootstrapped datasets and random subsets of variables (also known as bagging). With 1000s of smaller decision trees, random forests use a ‘majority wins’ model to determine the value of the target variable.

For example, if we created one decision tree, the third one, it would predict 0. But if we relied on the mode of all 4 decision trees, then the predicted value would be 1. This is the power of random forests.

AdaBoost

AdaBoost is a boosted algorithm that is similar to Random Forests but has a couple of significant differences:

  1. Rather than a forest of trees, AdaBoost typically makes a forest of stumps (a stump is a tree with only one node and two leaves).
  2. Each stump’s decision is not weighted equally in the final decision. Stumps with less total error (high accuracy) will have a higher say.
  3. The order in which the stumps are created is important, as each subsequent stump emphasizes the importance of the samples that were incorrectly classified in the previous stump.

Gradient Boost

Gradient Boost is similar to AdaBoost in the sense that it builds multiple trees where each tree is built off of the previous tree. Unlike AdaBoost, which builds stumps, Gradient Boost builds trees with usually 8 to 32 leaves.

More importantly, Gradient Boost differs from AdaBoost in the way that the decisions trees are built. Gradient Boost starts with an initial prediction, usually the average. Then, a decision tree is built based on the residuals of the samples. A new prediction is made by taking the initial prediction + a learning rate times the outcome of the residual tree, and the process is repeated.

XGBoost

XGBoost is essentially the same thing as Gradient Boost, but the main difference is how the residual trees are built. With XGBoost, the residual trees are built by calculating similarity scores between leaves and the preceding nodes to determine which variables are used as the roots and the nodes.

Who is a good Software Engineering Manager ?

This was my question since I was promoted as a Manager couple of years ago. As a person who don’t have much managerial experience in his career, this transition was confusing and overwhelming at the same time. It took me some time to figure out the messy situation I was in.  As a copy – paste software developer, my initial instinct was to google my role and responsibilities. Well, there was no copy-paste model for a Manager and it sucks.

So below I list some of the items I learned as a Manager over past few years.


Father / Brother / Sister

As a software developer you always think logically ( Sheldon from Big Bang Theory), but as a Manager you need to think logically and emotionally ( Kid born out of Penny and Sheldon).

I was surprised to learn how members of your team look at you and share their personal issues with you. Team will always see you as an elder brother or father figure. They will look up to you to make critical decisions. They wanted you to stop silly squalling by  team members. They wanted you to put the team in order. They wanted you to console them, when they are in deep trouble. You need to remember that some times your team members will act as irritated teenagers.  To manage all these, you need three critical skills.

Patience

Listening skills

Diplomacy


Gold, Silver or Shit

As a Manager how valuable are you to a company ?

As a mathematical equation, let assume

Managers value  as Mv

Product of the value of all the team member as Tv

Marketing effort of a Manager as MMv

Total value of other managers in company as TMv

Mv = (Tv * MMv) / TMv

This will work only if you have more than one Manager in your organization.

Your value as a manager is the total value of your team members and your ability to market your team inside your organization. But the manager value will also depends on the value of other Managers within your organization.

As a manager, you need to make sure that non of your team members value is zero also your marketing within your organization must not be of zero value. If any of those is the case, then total value of you will become Zero.

Published
Categorized as Manager

How to update Druapl 8 to Drupal 9

  • Ensure your hosting environment matches the platform requirements of Drupal 9.

Apache version requirement

If you are running Drupal 9 on Apache, at least version 2.4.7 is required.

PHP version requirement

Drupal 9 requires at least PHP 7.3. PHP 7.4 is also supported but not required. PHP 8 is not yet supported, but work will be done to support PHP 8 as soon as possible.

Database back end and other hosting requirements

If using Drupal 9 with MySQL or Percona, version 5.7.8 is required.

If using Drupal 9 with MariaDB, version 10.3.7 is required.

If using Drupal 9 with SQLite, version 3.26 is required. (PHP 7.4 does not use the system provided SQLite, so take extra care to make sure your PHP is compiled with at least this version).

If using Drupal 9 with PostgreSQL, version 10 is required with the pg_trgm extension.

  • Update to Drupal 8.8x or 8.9.x (if not already on that version)
  • Update all contributed projects and ensure they are Drupal 9 compatible
  • Make custom code Drupal 9 compatible
  • Update core code base to Drupal 9
  • Run update.php
Published
Categorized as Drupal